Knowing the ends-and-outs of your Graphic Software can save you a lot of time and money by reducing production times. Today we are going to discuss how one can quickly and easily run multiple applications at once, even if the design is different for each item being engraved.
This comes in particular handy when running the same sized trophy plates, name badges, or even signs.
Today we are going to show you how to create several trophy plates using the features on EngraveLab... This quick and simple solution teamed up with the speed of the Speedy 300 laser (engraving speeds of 140 in/sec) will have you on the golf course in no time!
 Step 1:
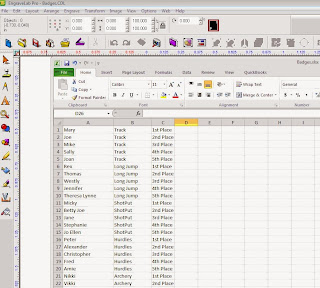
Start by creating an excel spreadsheet to capture all your data. Each column should represent a different line on the trophy plate.
For our project we used:
Column A for the student's name, Column B for their event, and Column C for their finishing place
Step 2:
Create a basic plate in EngraveLab using "Frame Text Compose"
Step 3:
Under "Layout" create a "Plate Object" will automatically create a box the size of your plate. Then use the "Stroke and Fill" tools to give the box hairline properties and set it to red.
Step 4:
Finishing Touches! We'll start by giving the plates round edges. This one's easier than you may think! Start by selecting "round corners" under "Transform"... Then simply indicate the desired value (I choose to use .250").
Step 5:
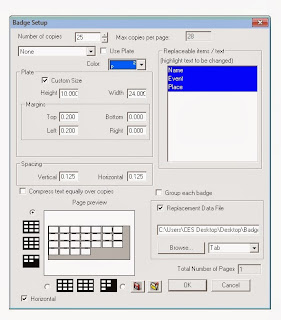
Select everything you want to make multiples then Layout - Badges.
Step 6:
a) Highlight the text to be replaced, browse for your data file location (Excel document we created earlier), EngraveLab will automatically determine how many plates are in the file.
b) Set a Plate "material" to the bed size of your laser or the material size you are using
c) Add some "margins" so you are not cutting against your rulers.
d) Add a small amount of "spacing". You will thank yourself later... Hint: no diamonds to clean up.
e) Click "Ok"
Step 7:
The Excel file is previewed, click "Ok". At this time the data can be edited, if necessary, once everything looks correct click "Ok".
Step 8:
Review and make any final adjustments. Notice how "Theresa Lynne" in the 2nd row is automatically compressed. Also by using the spacing function, in the badges setup, there will be 26 items to remove from the laser... 25 plates and 1 scrap "tree" containing the diamonds... A lot less cleanup at the end of the day when you remove your honeycomb cutting table.
Step 9:
Once satisfied we can print to the laser, here we're using JobControl to send the laser to our Trotec Speedy 300!
And presto you're done in less than 10 steps!
About the Author:
Today's article was written by Chris Dool of Computerized Engraving Services. Chris has been using Trotec lasers since 2010 and in the laser industry in 1995. Chris' goal is to help his clients by examining their technical and application needs in the engraving, marking, and cutting industries. Finding the right equipment and process to meet his customers production, application, and budgetary needs is his top priority.
This comes in particular handy when running the same sized trophy plates, name badges, or even signs.
Today we are going to show you how to create several trophy plates using the features on EngraveLab... This quick and simple solution teamed up with the speed of the Speedy 300 laser (engraving speeds of 140 in/sec) will have you on the golf course in no time!
 Step 1:
Start by creating an excel spreadsheet to capture all your data. Each column should represent a different line on the trophy plate.
For our project we used:
Column A for the student's name, Column B for their event, and Column C for their finishing place
Step 2:
Create a basic plate in EngraveLab using "Frame Text Compose"
Step 3:
Under "Layout" create a "Plate Object" will automatically create a box the size of your plate. Then use the "Stroke and Fill" tools to give the box hairline properties and set it to red.
Step 4:
Finishing Touches! We'll start by giving the plates round edges. This one's easier than you may think! Start by selecting "round corners" under "Transform"... Then simply indicate the desired value (I choose to use .250").
Step 5:
Select everything you want to make multiples then Layout - Badges.
Step 6:

a) Highlight the text to be replaced, browse for your data file location (Excel document we created earlier), EngraveLab will automatically determine how many plates are in the file.
b) Set a Plate "material" to the bed size of your laser or the material size you are using
c) Add some "margins" so you are not cutting against your rulers.
d) Add a small amount of "spacing". You will thank yourself later... Hint: no diamonds to clean up.
e) Click "Ok"
Step 7:
The Excel file is previewed, click "Ok". At this time the data can be edited, if necessary, once everything looks correct click "Ok".
Step 8:
Review and make any final adjustments. Notice how "Theresa Lynne" in the 2nd row is automatically compressed. Also by using the spacing function, in the badges setup, there will be 26 items to remove from the laser... 25 plates and 1 scrap "tree" containing the diamonds... A lot less cleanup at the end of the day when you remove your honeycomb cutting table.
Step 9:
Once satisfied we can print to the laser, here we're using JobControl to send the laser to our Trotec Speedy 300!
And presto you're done in less than 10 steps!
About the Author:
Today's article was written by Chris Dool of Computerized Engraving Services. Chris has been using Trotec lasers since 2010 and in the laser industry in 1995. Chris' goal is to help his clients by examining their technical and application needs in the engraving, marking, and cutting industries. Finding the right equipment and process to meet his customers production, application, and budgetary needs is his top priority.


Nice blog! Thanks for sharing informative and valuable information..
ReplyDeleteThanks,
Name badges