Showing posts with label Laser Applications. Show all posts

Saturday, July 1, 2017

Our Blog Has Moved

Thank You for visiting. Our blog has moved.


Read our archives here and visit www.troteclaser.com for new blog posts.

Monday, February 29, 2016

Laser-cut acrylic jewelry

Design your own jewelry, then use your laser to bring your design to life!


Let your imagination run wild and create your individual acrylic jewelry. Practically any design, can be processed with a laser.

Today, we're sharing these lovely files for you to make your own jewelry... All you need is a CO2 laser and acrylic!


Required Materials:
3 mm acrylic
eyelets
hooks

Suitable Machines:
All Rayjet Lasers 30W and above
All CO2 Speedy Lasers

Used Trotec Laser:
We made the pictured earrings and necklace using the Speedy 300 with a 60W CO2 laser and a 2.0 inch lens.

Tips:
Dark colored or radiant acrylics look very elegant
We used plexiglas/acrylite made by Evonik
Use a 2.0" lens for a perfect cut

Step 1:
Create your own design or download and use the template we've already made for you. Send it to the laser with the recommended laser parameters. The parameters might vary depending on the machine used and the available laser power.

Used cutting parameters: We used 100% power, Speed 1.0%, Frequency 5,000 Hz, and Air Assist ON.

Trotec's air assist helps direct derbies away from the material, lens, and promotes air flow. It will help prevent flair-up and improve cut quality.

Step 2:
If you would like to make a jewelry stand you can now process the template we provided you, or make your own! Keep in mind, the stand has to be high enough to carry a necklace and have a stable pillar.

Used engraving parameters: We used 20% power, Speed 50%, 500 ppi, and Air Assist ON.

Used cutting parameters: We used 100% power, Speed .5%, Frequency 1,000 Hz, and Air Assist ON.

Step 3:
Use eyelets and hooks to attach the pieces on a necklace. There are special hooks for the earrings. You can find such materials at hobby and craft stores or online at websites like Amazon.

Download:

Share Your Work:
We love seeing what our customers create. Share your work on platforms like Instagram and Twitter with #TrotecJewelry we just may give you a shutout for a job well done!

Friday, February 19, 2016

Benefits of Lasers for Industrial Applications

Laser Marking: A Better Way

Looking to generate data plates, industrial tags and markable labels?
If you're like most of our industrial customers, you want to lower production and maintenance costs, reduce turnaround times, streamline processes and increase throughput.
Industrial facilities use a variety of methods to generate data plates, industrial tags, and markable labels, including:
  • Thermo-Transfer Printing
  • Inkjet Systems
  • Laser-Printed Labels
  • Embossing
  • Mechanical Stamping
  • Dot Peen
  • Etching
  • Chemical Etching
  • Pad Printing
  • Mechanical Engraving
If you are using any of the methods above, you may be missing a valuable opportunity to improve efficient workflow and reliable delivery, quality of mark, and lower costs per marking.
Laser marking offers all these benefits and more, including:
Durable Mark
Laser marking is abrasion, heat and acid resistant, which is a major requirement for data plates and industrial tags. Depending on the laser parameters, it is possible to mark certain metals (e.g. stainless steels) without leaving tangible depressions on the surface (annealing).
Flexible - Variable Data
Need to process variable data? The laser is the perfect tool to mark with either just-in-time online data or with data imported from any external system (such as office programs, files, SAP, databases, etc.).
Economic Production
Since there are no setup costs, as for example with pad printing, the costs per mark are always the same, whether you need one piece or 1000. You can work with different shapes or sizes at the same time. Laser engraving does not incur any costs for consumables such as ink, chemicals, pastes, or sprays (and therefore no disposal costs either). Lasers also save time and money by eliminating the costs and time required for fixturing that is necessary with all types of contact marking. Energy consumption is low and setup time is reduced to a minimum.
A Precise Tool for All Materials, Sizes, & Shapes
The laser beam is the most complete tool for metals and many kinds of plastics. All used material can be marked directly and precisely with the laser without any additional setup or chemical additives such as sprays. Even 1-point lettering (needed for very small plates) and fine lines like technical drawings are clearly legible.
Easy Handling
It is a good idea to use a system with a software package that fits perfectly to the machines and are compatible with all graphics, CAD, label printing, and similar programs. This eliminates the need to learn a completely new software program– the whole job setup can be done in the laser software after preparing it in the daily used program.
Environmentally Friendly
Laser technology does not require any chemicals such as inks, acids, or solvents. Therefore there is no need for costly disposal and you're not restricted by any legal environment restrictions.
Lowest Wear and Tear
Due to the contact-less process and a limited number of moving parts, wear and tear can be kept to a minimum. This also saves money, and reduces downtime associated with maintenance.

Wednesday, May 13, 2015

Trotec Laser & Construct A Truck Hit the Road

The past week Trotec Laser has partnered up with Detroit area customer Construct A Truck on a multi-leg road trip to showcase fun and educational ways customers are using Trotec lasers.  At each stop, Construct A Truck featured its Mobile Assembly Line, a hands-on demo of the assembly process used to build the Model B Truck. Materials to assemble trucks were available onsite for purchase.


Successful First Stop. 

 
We kicked off our two week road trip on May 9th with our first stop at the Annual Arts & Crafts show in Park Ridge, IL.  The weather wasn’t spectacular and Trotec and Construct A Truck were up to the heels in mud, but what a success the stop was leading to our first of many truck sales! We met with new and familiar faces and had a lot of fun demonstration our collaboration. After that we've made stops in Mississippi, Wyoming, and today we got up early to see the sunrise in Nevada.


 What's next?

 
We are going to continue to roll our way to the Bay Area Maker Faire held on May 15-17 in San Mateo, CA. This Faire is the peak of all of our stops on this road show and will showcase creative, makers in the areas of science and technology. engineering, food, and arts and crafts. After that we continue on with an Educators event in San Francisco, CA on May 18th and the final stop at MTRL Design in Omaha, NE on May 21st. 
 
 
Taking Pictures? Tag Us! #Trotrip.


Wednesday, April 15, 2015

Laser Cutting Acrylic for a Flame Polished Edge: Part 3

  • Focal Length

    The focal lens choice will play a role in the edge quality. Ideally a 2.5” lens will work with thicknesses up to 3/8-1/2”. Anything thicker may require a 4”, 5”, or maybe even a 7” lens. This is where laser power will come into play. When the focal distance increases, the amount of energy of the laser will seem to decrease. Not having enough power will mean slowing the laser down significantly to cut through the material. There is a point where cutting slower will not work because it will increase the chance of flare-ups that can occur when cutting acrylic too slow. Acrylic is flammable and the only cure for this is more laser power. Then the acrylic can be cut at optimal and production friendly speeds and still get the nice polished edge. Achieving a high quality edge with multiple passes is very difficult.
  • Focal Point

    ​Focal point will have an effect on the angle of the cutting edge. The thicker the material the deeper “into the material” the focal point should be. For acrylic over 1/4" thick, you should focus in 1/3 of the total distance ( ½” acrylic would need to be focused in approximately 3/16”.) This will keep the edge as straight as possible. The longer the focal point of the lens, the straighter the edge will be.

Wednesday, April 8, 2015

Trotec Celebrates 10 Year Anniversary of Dual-Source Laser Technology

Trotec Celebrates 10 Year Anniversary of Dual-Source Laser Technology

The pioneers of the first dual-source laser system celebrate 10 years of innovation and technical advancement

Trotec Laser, a leading provider of advanced laser equipment, is celebrating the 10 year anniversary of their flexx series, the first dual-source laser system. The innovative dual-source technology combines a fiber laser and a CO2 laser in one system, which enables businesses to produce more products in less time while reducing maintenance costs. Trotec was the first company to develop this technology, and it has been testing, refining and improving it for the past decade.


Why two laser sources are better than one

Trotec's patented flexx system maximizes output and reduces overhead, providing a rapid return on the investment. The system combines a CO2 laser for cutting and engraving a wide variety of materials (including plastic, wood, rubber and glass) with a fiber laser for marking plastics and metals, eliminating the need to use and maintain separate systems to process jobs that require both laser types. Using a single system is more efficient because it eliminates the need to stop and start jobs, and with one system and one beam source, maintenance costs and processing times are cut in half. 


Maximum flexibility

Trotec flexx systems are available in more than 30 configurations and different power levels (up to 120 watts for CO2 lasers and up to 50 watts for fiber lasers). Customers can add flexx to Speedy systems at any time. The systems come with user-friendly, patented Job Control workflow software that integrates easily with existing systems.

"We have spent the past ten years testing and improving our dual-source laser systems," says Warren Knipple, president of Trotec Laser, Inc. "Our experience allows us understand and accommodate our customers' diverse needs and provide a highly refined product with superior performance." 


About Trotec

Trotec is a leading international provider of advanced laser equipment for a range of applications, from laser cutting and engraving to industrial marking. The company's extensive line of quality laser engravers, cutters and markers, coupled with its unmatched service and support offerings, have made Trotec one of the industry's leading resources for computer controlled engraving equipment and marking systems. Trotec machines are currently used in more than 90 companies around the globe.


More flexibility. More options. More potential.


Thursday, December 18, 2014

Laser Cutting Acrylic: Flame Polished Edges 2


Laser cutting acrylic is an art and a science. There are many factors that will play a role in your ability to get the best possible edge; both in the material as well as the laser cutting machine itself. For example, the brand of acrylic and the type of acrylic can greatly impact the job. Other factors include laser power, frequency, speed as well as the laser table setup, focus, gas, exhaust, and material preparation.

Motion System

It's important to factor in the power and velocity of motion system during cutting. Sometimes it is better to slow the laser down AND lower the power in order to lessen the vibration of the motion system.

The lasers ability interpret curves and how smooth the laser’s motion system can change directions is critical. A very “clunky” motion system will produce waviness in the acrylic. Trotec's Speedy series uses brush-less servo motors for smooth motion across the work piece.

Printer Driver

Keep in mind how the laser’s printer driver sends a curve to the laser. If the curve are a jumble of nodes, the edge quality will resemble a coins edge. By reducing the nodes in the original file and using Enhanced Geometries in JobControl you're curves will be smooth.

More to Come

​Stay tuned for more tips on getting flame polished edges when laser cutting acrylic.

Thursday, December 4, 2014

Laser Kiss Cut Sticker Labels


Laser kiss cutting allows you to cut the top layer of a material without cutting through an attached material like an adhesive backing, like stickers for example. By using a laser, operators can engrave, kiss cut, perforate, and cut through all in one easy process. Making laser's a flexible, cost saving, and time effective solution.

​Follow some basic recommendations to receive the best result:

Table: Use a vacuum table and acrylic cutting table. All parts not covered by the sheets should be covered with paper and/or tape for best results.

Focus: First switch on the vacuum and focus afterwards.

Engraving Direction: Engrave from bottom to top. This ensures that the core will not be colored by the removed layer above.

The Right Material - Flexible & Resistant

LaserLIGHTS by Rowmark is a durable 2-ply acrylic foil with an adhesive backing that perfectly suits this kiss cut application. The very thin top layer allows fast and precise engraving. The self-adhesive foil bonds very well to metals, plastics, rubbers, woods & foams, which makes it the perfect material for many applications.

LaserLIGHTS has excellent exterior properties and is resistant to water, solvents, abrasion, and extreme temperatures. Typical applications include nameplates, labeling of awards and trophies, warning signs, promotional labeling, electronics, appliances, recreational vehicles, computers and packaging.

Thursday, November 27, 2014

Laser Cutting Acrylic: Flame Polished Edges


Flame Polished Edges


Laser cutting acrylic is an art and a science. There are many factors that will play a role in your ability to get the best possible edge; both in the material as well as the laser cutting machine itself. For example, the brand of acrylic and the type of acrylic can great impact the job. Other factors of variance include laser parameters: power, frequency, and speed; and laser process setup: table setup, focus, gas, exhaust, and material preparation. 


It's true that laser cutting acrylic can be very profitable, but it is also quite difficult, especially if you are after the “flame polished edge”. In this series of articles are several best practices and tips-of-trade for processing acrylic on laser cutting machines, starting with choosing the correct type of acrylic. 


Choosing Your Acrylic


First, let's discuss brand and type of acrylic. The type of acrylic can actually affect the edge quality. Extruded cuts better than cast; however, it will not frost when engraved and can leave a burr on the edge of the piece. So it's important to know the goals and priorities of the project and customer. Cast acrylic will cut just as good as extruded, but will require more intense power settings than extruded.


Types of Acrylic Masking


The masking of the acrylic also makes a difference in edge quality. In the U.S., cast is almost always going to be paper mask. Extruded can be found as both paper and film mask. The film mask is much easier to cut, and it doesn’t require the top mask to be removed like cast. If the paper mask is not removed off the top, it is very difficult to get a smooth edge. The paper mask that is left on the top side is also very prone to flaming, which will ruin the piece if the burning is bad enough.


More to Come


Ensuring that you have chosen the correct type of acrylic is step one in getting perfect results when laser cutting for flame polished edges. Stay tuned for more tips on getting flame polished edges when laser cutting acrylic.


Thursday, November 20, 2014

Holiday Ornament

Every year we share a new holiday ornament for the holidays, This year's holiday ornament is sponsored by Construct a Truck USA.


Construct A Truck USA, a Trotec customer, is a unique and creative, family-owned company based in Michigan. Their vision: A smaller kind of car company with a big idea: Let youngsters build their own model truck on an assembly line! With that spirit in mind, Construct A Truck USA owner Jim Bustamante is sharing downloadable files of a miniature truck ornament that will enjoyed on Christmas trees across the world for years to come.


Wednesday, August 6, 2014

Simplified Seal Process in JobControl X

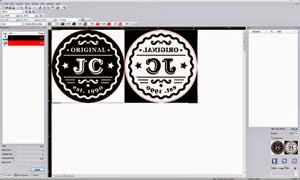
Every seal press consists of two die plates - the positive (female) and the negative (male).
For the positive die plate (displayed as black text/graphics on a white background in the graphics program) the black elements are engraved into the Delrin material.

For the negative die plate on the other hand (displayed as white text/graphics on a black background in the graphics program) the entire black surface is ablated by the laser. 

Consequently, the created text or graphic appears raised on the die plate. The two die plates need to fit perfectly in  each other to achieve perfect relief print quality. That's why the text/graphic elements must be produced slightly enlarged on the positive (female) plate. There is no need to adapt the size of the female plate manually. JobControl X (from version 10.3 on-wards) automatically creates the positive (female) and the negative (male) die plate with only one click by choosing the process type "Seal" in the Trotec print driver.

Creating the Graphics 
In this example, the graphics are created in CorelDRAW. However, any other graphics program, such as Adobe Illustrator, Freehand, etc., may also be used. Please note that you don't have to draw the outer cutting line and the positioning nose (triangle recess), JobControl X will do this for you, allowing you to focus on the elements inside the cutting line - your layout. JobControl X also automatically enlarges the elements according to the selected paper thickness for the positive (female) die plate. In the JobControl X software, we provide predefined seal templates according to current seal sizes available on the market.

Send Graphics to the Trotec Laser Machine 
  • Send your graphic design to the laser by using the Trotec print driver.
  • Choose the size of your Seal
  • Choose your material; make sure to activate engraving and cutting process
  • Select the process mode "Seal" and choose the correct paper quality
  • Start the laser engraving machine by clicking on the button JC

 
Produce Your Die Plates with the Trotec Laser Machine 
  • Your seal job now appears in your job queue; double click to position the job on the plate at 0/0.
     
  • Job preview is available of the negative (male) and positive (female) die plate, notice that JobControl automatically created the positive plate, the cut line, and the positioning nose.
  • Now connect to your laser machine and start the laser process.


Machining and Assembly
After the laser processing, you just need to clean the die plates, pate them into the seal press and then you can already emboss the paper.

Simply wash the finished Delrin die plates with water and a little soap or dish liquid and wipe off any still adhering dust with a brush (clean using compressed air if necessary).

The die plates can be quickly pasted into the seal press using the supplied doubled-sided adhesive circles. The recessed die plate is pasted onto the top and the die plate with the raised text is pasted onto the bottom (at the holes punched into the seal press itself).

  • First fix the thicker of the two supplied double-sided adhesive circles onto the back of the recessed die plate (female) → then paste this die plate, with the "nose" pointing to the front, on-to the top part of the seal press
  • Now paste the thinner adhesive circle onto the back of the die plate with the raised text (male) → pull off the carrier material on the back → now fix the die plate with the raised text into the recess of the already installed die plate, so that the two die plates snap together
  • Tip:  the two noses on the die plates should be perfectly aligned on top of each other → now press down on the seal press, whereby the second plate is fixed into the press → you can now place a piece of paper into the fully assembled seal press → press down → result: relief embossed paper
  

Friday, July 25, 2014

Laser Cutting Acrylic for a Flame Polished Edge


Laser cutting acrylic can be very profitable, and also very difficult, especially if you are after the “flame polished edge”. There are many factors that will play a role in your ability to get the best possible edge; both in the material as well as the laser system itself.

Here are some tips for getting the best possible flame polished edge when cutting acrylic:

Velocity of motion system during cutting. Sometimes it is better to slow the laser down AND lower the power to not overpower the material. The less vibration the motion system makes the better the cut.

The performance of motion system in the change of direction. This would include the lasers ability interpret curves, as well as how smoothly the laser’s motion system can change direction. A very “clunky” motion system will show up as waviness in the acrylic in and around changes of direction.

How the laser’s printer driver sends a curve to the laser. If it sends the curve as a jumble of nodes, this will also translate to the edge quality and look like a “coin edge”. Reducing the nodes in the original file or using the Enhanced Geometries settings will help smooth out the curves.

The type of acrylic will also affect the edge quality. Extruded cuts better than cast; however, it will not frost when engraved and can leave a burr on the edge of the piece. Cast acrylic will cut just as good as extruded, but will require more intense power settings than extruded.

The masking of the acrylic also makes a difference in edge quality. In the U.S., cast is almost always going to be paper mask. Extruded can be found as both paper and film mask. The film mask is much easier to cut, and it doesn’t require the top mask to be removed like cast. If the paper mask is not removed off the top, it is very difficult to get a smooth edge. The paper mask that is left on the top side is also very prone to flaming, which will ruin the piece if the burning is bad enough.

Focal lens choice also will play a role in the edge quality. Ideally a 2.5” lens will work with thicknesses up to 3/8-1/2”. Anything thicker may require a 4”, 5”, or maybe even a 7” lens. This is where laser power will come into play. When the focal distance increases, the amount of energy of the laser will seem to decrease. Not having enough power will mean slowing the laser down significantly to cut through the material. There is a point where cutting slower will not work because it will increase the chance of flare-ups that can occur when cutting acrylic too slow. Acrylic is flammable and the only cure for this is more laser power. Then the acrylic can be cut at optimal and production friendly speeds and still get the nice polished edge. Achieving a high quality edge with multiple passes is very difficult.

Focal point will have an effect on the angle of the cutting edge. The thicker the material the more “into the material” the focal point should be. For acrylic over 1/4" thick, you should focus in 1/3 of the total distance ( ½” acrylic would need to be focused in approximately 3/16”.) This will keep the edge as straight as possible. The longer the focal point of the lens, the straighter the edge will be.

Air assist optimizes acrylic cutting.  It does not take much air pressure, 5 PSI or more PSI if your nose cone is high above the acrylics surface. Too much air will force the molten acrylic to dry too quickly and give you a bubbly and cloudy edge. The air helps push the acrylic off-gas down into the cut so that the fume extraction/dust collection system can then pull the debris out of the laser system.

The Fume Extraction/Dust Collection’s ability to remove the off-gas will help keep the hot gases from staining the areas around the edges. The more the CFM the better. This also reduces the chance of a flare up, since it is pulling the acrylic off-gas out of the laser faster.

By Chris Cudmore, Regional Sales Manager, Trotec Laser, Inc

Friday, June 20, 2014

President Obama Uses Trotec Speedy 300


Obama Tours TechShop
On June 17, 2014, President Obama visited Pittsburgh to highlight creative ways to boost manufacturing and to promote his program that helps provide entrepreneurs access to more than $5 billion in advanced manufacturing equipment. During his visit, he took a tour of Pittsburgh's TechShop to see first hand how entrepreneurs are utilizing manufacturing "maker spaces" such as TechShop. President Obama saw several demonstrations, including one on a 3D printer and a Trotec Speedy 300 laser system.

"We need to encourage more and more entrepreneurs and inventors to not just take root here, but have access to equipment and technology," President Obama said.


Speedy 300 Demonstration 
James Gyre of Naked Geometry demonstrated the laser process, creating a wood ornament entitled “Prayer for Peace” on a Trotec Speedy 300 laser. “It's a mandala of abundance, life and earth. It contains the numbers 12 (for plant life) and phi (for human life) and the infinity symbol.” explains Gyre. The fine detail of the design and intricacy of the cuts, showcased the Speedy 300's speed, precision, and intelligent engineering. After the laser processing was completed, Mr. Obama held it up and declared with a smile,  “This is pretty”. 
 

Wednesday, April 23, 2014

Spring Table Top: Make Your Own Laser Cut Napkin Rings and Flower Cutlery Bags!

Get in the mood for spring by decorating your table with laser cut butterfly napkin rings and flower cutlery bags! With these cheery table top decorations the spring mood will stay in your home... Even during rainy days!

Materials Needed:
4mm polyester felt in two colors


Machines possible:
Speedy 100, Speedy 300, Speedy 400, Speedy 500


Machine used:
Speedy 400, 40 watts


Step 1
Open the file "Spring" in your favorite graphics program and send it to the laser. Laser parameters may vary depending on the machine used and the laser power available... The seetings below are for a 40W Trotec laser system. 


Black Lines (engraving)
Power: 60 %, Speed: 50 %, Resolution: 500 dpi, air assist on 


Red Lines (cutting):
Power: 60 %, Speed 1.1 %, Frequency 1000 Hz, air assist on, correction 20


Step 2
Assemble the parts. The table decoration is designed to fit perfectly without adhesive.

Tips:

  • Use a 1.5 inch lens. 
  • We suggest using polyester felt for clean cutting edges and great engraving results. 
  • Using a honeycomb table prevents the felt rub off on the processing table.

Download Spring Application Files!

We would love to see your completed projects... Share your table decorations on our Facebook page!